Navigation:
Continuing the theme of summer crafts, let's talk about how to make jewelry with your own hands. It will be interesting for girls to make bright bracelets, fashionable beads, unusual rings and other decorations for summer outfits with their own hands. Of course, mothers will help them in this exciting creative activity.
It is very easy to make wooden bracelets ice cream sticks or medical spatulas. To do this, you must first soak them in water for a day so that they become flexible. To speed up this process, it is sometimes advised to “boil” them for 15 minutes, but after that the sticks may darken.

Now you need to get them out of the water and very carefully place them in a glass or cup of a suitable diameter so that the sticks take their shape. Leave them in this position to dry. Before removing the sticks from the cups, make sure they are completely dry.

These are the blanks for bracelets you should get.

It remains to paint the bracelets with your own hands with paints, decorate with fabric, decoupage paper appliqué, beads, buttons, etc.

Important! it is better to make a bracelet of a slightly smaller diameter than you need, because. when decorating a bracelet, in particular, when processing it with paint and glue, it may straighten a little and become larger.
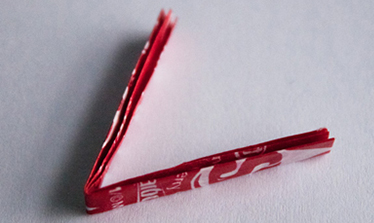
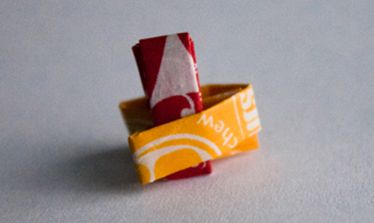
Origami paper bracelet
It is easy to make a bracelet with your own hands using the origami technique from candy wrappers. A detailed master class on making an origami bracelet. If you do not have the opportunity to collect so many candy wrappers, then you can make an origami bracelet from colored paper.


We will talk about how you can make fashionable bracelets from plastic bottles. We remind you of this craft once again.


To make these bright floss bracelets, you will need:
- leather lace
- floss threads of different colors
- beautiful button
- scissors


The easiest way to make an elegant bead bracelet is to buy an inexpensive bracelet and pretty beads in the jewelry department, and then “string” the beads with colored yarn or thread to the bracelet.

Making such a jewelry with your own hands is quick, simple and inexpensive, so you can afford to have bracelets of different colors that match different outfits. This is what the finished product looks like on hand.

You can use a handmade bracelet instead of a purchased bracelet.
Or you can “tie” purchased beads to a leather cord. This beaded bracelet looks very stylish. It can be wrapped around the wrist several times.

We looked at easy-to-make DIY bracelet options that parents can make even with preschool children. Now let's move on to more complex master classes on how to make a bracelet.
Beaded bracelets
Now we will teach you how to weave bracelets from beads and beads in the simplest way, accessible even to beginners in learning the science of beading.
Do you know how to weave an ordinary pigtail? If the answer is yes, then you can quite cope with the task of making such a bracelet from small beads (beads) and waxed cord. You just need to consistently weave the beads into a pigtail, which is woven from the cord.


In the same way, you can weave a bracelet from a thick rope and hexagonal nuts.

One of the most beautiful and stylish, in our opinion, bead bracelets, which even beginners in beading can do.


To make such a bracelet with your own hands, we need:
- any beads small size (4-6 mm). The number of beads depends on how long the bracelet you want. Decide in advance whether he will wrap around his wrist one or more times.
- leather cord
- durable threads suitable color. The threads do not have to match the leather cord, they can be in a contrasting color. A prerequisite: the thread must be of such thickness that, folded twice, it can pass through the hole in the bead.
- beautiful button for fastening
- needle, scissors, clip for fastening the bracelet in the process of weaving
Work plan:
1. Measure the desired length of leather cord. Keep in mind that the cord folds in half and that you need to leave an extra length for the fastener.
2. Measure the thread of the desired length, thread it through the needle, tie a knot. The thread must be double.
3. Fold the leather cord in half, attach the thread to it with a knot up, while the needle will hang at the bottom. Leave a small gap for the fastener loop and make a knot by tying the cord and thread together. Before you make a knot, make sure that the fastening button goes through the buttonhole.

4. Attach the string with clips to a piece of cardboard on both sides for ease of use. You don't need to attach a thread. Now we proceed directly to the weaving of the bracelet.

5. First we will make a few stitches without adding beads. Pull the thread OVER the right end of the lace, now back BELOW it, then ABOVE the left end of the lace and back BELOW it. The stitch is shaped like an 8. Do this 5-6 times.
6. Now let's start adding beads between the two ends of the lace. When the thread comes out UNDER the left end of the cord, add a bead. Now pull the thread OVER and back UNDER the right end, through the bead again, then OVER and back UNDER the left end of the cord. Now add another bead and so on.


7. Tie a button at the end for fastening. The bracelet is ready.
Video lessons
Video Lesson #1
Video lesson number 2
Video lesson number 3
Video lesson number 4
It comes from the depths of centuries, and today weaving products from these small glass or plastic beads is one of the most popular forms of needlework. The best part is that it is not necessary to spend a huge amount of time on this activity. You will not need a lot of money to buy material and accessories. And the main thing is that almost everyone can be engaged in beading.
What can be made from beads?
Despite its external simplicity, beads are one of those rare materials, working with which you can give full freedom to your imagination. With it, you can create magnificent panels, embroider, make both flat and voluminous toys, flowers and trees. However, jewelry is especially fond of most craftswomen, and many beginners, looking at the work of their more experienced colleagues, ask themselves: “How to weave beaded bracelets?” Practice has proven that it is not so difficult. And weaving the simplest jewelry is possible even for those who have never dealt with beads before. In what way? Let's find out!
A variety of shapes and types - weave your own bracelet!
Any beaded jewelry that is made by hand is unique. And, as a rule, there is no one similar. This is not surprising, because despite the fact that they are woven according to the same principles and patterns, you can weave a variety of simple beaded bracelets, each of which will be combined with an outfit carefully selected for any occasion. Beginners are advised to start with simple patterns.
When weaving a bracelet, you are not limited in the choice of material. You can choose small beads or large ones, any shape you like: both standard round and square, oval, triangular and many others. You can not be limited only to beads, but also buy short sticks, called cuttings, or long ones - glass beads. To create more complex products, craftswomen purchase large beads, sequins, cabochons - specially processed precious and semi-precious stones, which are widely used for making jewelry.
The choice of the shape of the bracelet is also up to you: you can make a thin chain of beads or weave a wide beaded bracelet. It all depends on your preferences and on what kind of product you ultimately want to see on your hand.
Weaving can be different: both openwork and solid, with various inclusions. Your imagination is not limited by anything except opportunities, knowledge, skills, and, of course, materials.
You do not have to take one color at all if you are planning to create beaded bracelets with your own hands. Weaving patterns, which can be found in beading books, completely untie your hands. Do you want a bracelet with a pattern? There is nothing easier! With your name or the name of the person you want to present your creation to? No problem! Would you like to wear a bracelet with some kind of inspiring statement on your hand? You are welcome! Turn on your imagination - and go!
Necessary tools for work
What should be stocked up for those who decide to learn how to weave beaded bracelets?
First, of course, you need the beads themselves. Experienced craftswomen recommend buying material specifically for each individual product. In this case, you will know exactly how many beads and what color you need, and therefore, you will not gain too much. Beginners are advised to take a little more material, with a margin.
Secondly, you need to buy the thinnest fishing line that you can find. In some weaving patterns, beads are strung on a strong thread. However, it should be remembered that the thread can rot and break over time. Then the decoration you made will be destroyed.
Thirdly, no less important is where the beads will be during operation. Getting it out of the package is not very convenient, so you should find some convenient container where you can pour it. A good and easiest option is a plastic cover. Also in textile stores you can buy special containers for storing beads and working with them.
Fourth, if you decide to work with a thread, you will need a very thin and short needle. When working with fishing line, it is usually not used, since the fishing line itself is very stiff, and there is no special need for a needle.
Fifth, for most products you will need clasps, which can also be bought at a specialized store, but some bracelets do not provide them.
Of course, any craftswoman cannot do without scissors in her work. This is not surprising: you never know what needs to be cut off or trimmed during operation.
And, finally, those who want to learn how to weave beaded bracelets cannot do without free time. It does not have to be a lot, an hour or two can be devoted to this exciting activity. You should also be patient and train perseverance, without which you will never get the bracelet of your dreams.
The simplest bracelet
This simple bracelet is woven in a pattern called a "cross". It is ideal for beginners, it is easy to master one of the techniques of how to make a beaded bracelet with your own hands. Here you can use either one color or two.
In order to make such a bracelet, you should:
- Take a fishing line or thread with two needles, string 4 beads on its middle.
- With one end of the fishing line (thread) pass through the last bead towards its other end, tighten to make a cross.
- Next, you should dial one bead at each end of the fishing line (thread), pass the third bead through both ends and tighten.

The result should be the chain you see below. You can make a simple but very pretty bracelet out of it, if you pick up two more beads, pass both ends through the first bead of the chain, then, tightening and securing the fishing line or thread, cut it off.

Bracelet with flowers
This type of bracelet will also be within the power of beginners. Making it will be another good training for anyone who has started learning how to make a beaded bracelet. You will need beads of two colors. One (for example, red) will be the petals, the second (for example, yellow) will be the core of the flower. The flowers can also be multi-colored according to your wishes.
To make it you need:
- Tie a knot, securing the end of the fishing line, leaving a small tip to secure the ends of the bracelet.
- Dial five red beads and one yellow.
- Pass the needle through the first bead.
- Dial three more red beads, insert the needle into the nearest red bead and tighten.

As a result of these manipulations, a flower should be obtained. To make a bracelet, make the required number of such flowers, fasten the ends of the thread and cut.
tourniquet
For those who have already mastered the simplest technologies of how to weave beaded bracelets, it will be interesting to weave a cord bracelet that stretches as if it were made on an elastic band. To make it, you will need a large amount of beads, as it is woven in a circle. In order to make it easier to master the technique, let's try to weave a one-color tourniquet.
For this you need:
- Fasten the end of the thread, leave a small piece of it.
- Dial 7 beads and close them into a ring, threading the thread through the first.
- String one bead and thread the thread through the third bead.
- Take one bead again, draw the thread through the fifth bead.
- Continue weaving, putting on one bead at a time and passing the thread through the bead located through one from it. Weaving will go in a spiral.

Weaving a tourniquet of the desired length, tie the ends together. Or sew a lock to one end and a clasp to the other.

Name bracelets
A beaded bracelet with a name will be a wonderful gift for a loved one. To make it, you will need beads of several colors. The product itself is woven according to the "brick" pattern, it is also called "mosaic". If you do not know how to weave a beaded bracelet using a similar technique, and are afraid that nothing will work out for you, do not worry: even beginners can do such a bracelet. In a similar way, you can make a product of any thickness and with any pattern, while the bracelet itself will turn out to be durable, similar to a strap.
For manufacturing, you need to do the following:
Draw a diagram of the future bracelet on a piece of paper in a cage, paint over the beads that will be the name. Also, if you want to make other similar beaded bracelets, weaving patterns can be found in special editions. For example, we decided to make a bracelet with a width of 10 beads. For this you need:
- Fasten the end of the thread, put 10 beads on it.
- From the last bead, return to the previous one through the top so that the fishing line looks down.
- Thread the thread back into the last bead through the bottom.
- Continue to weave in this way: take one bead, thread the line into the tenth through the top, and into the eleventh (last) through the bottom. Etc.

- Remember to follow the pattern and weave in the beads of the right color to get the right name or word.

As you can see, learning how to weave a beaded bracelet is not so difficult. The suggested schemes are simple and ideal for starting to master the art of beading. Let making beautiful jewelry with your own hands will not be a problem for you. Creative success to you!
Beads are small beads with a slightly flattened shape at their holes. It comes in various diameters - from one to five millimeters. It can be elongated, with several faces, these beads are called glass beads and their diameter is also different - from two to eight millimeters. Bugles with beads come in a variety of shades and colors, with a matte and glossy surface. The appearance of your product will depend on these elements if you are going to make beaded bracelets with your own hands.
Where did the beads come from
Many historians claim that glassmaking appeared and successfully developed six thousand years ago. The birthplace of beads is Phenicia, where glass beads were made. At first they were large, but as the production developed, they became smaller and smaller and finally turned into beads. In our area, the flourishing of beading and the direct appearance of beads fell on the second half of the 18th century. In those days, many different useful items were made from it: wallets, jewelry, cases for household items, decorations for churches. Already in those days, beauties knew how to weave beaded bracelets, and it was also used to embroider large beautiful paintings and clothes.
In the last century, the most popular beaded jewelry was among the hippies. It is worth noting that it was they who began to string beads not on a fishing line, but on a thread.
What beads are needed to make a bracelet
Like any other activity, weaving beaded bracelets requires a little preparation. First of all, buy a few bags of beads.
You can choose beads:
- large or small;
- round, square or any other shape.
It is not at all necessary to use one color of beads during work, patterns for weaving bracelets from beads will come to the aid of your imagination, and there you can pick up different patterns, sayings or weave your name. You can make a thin bracelet or a large and massive one.
The form of weaving is also different:
- openwork;
- solid;
- with different inclusions and much more.
For each bracelet, it is better to buy beads separately, so it will be easier for you to understand what beads are required and how many to buy. It is better for beginner craftswomen to take beads with a margin.
An example of a bead weaving machine
What to cook besides beads
If you are going to weave beaded bracelets, you can find patterns for such products on the Internet or in various magazines. Also, such schemes can be bought in those stores where beads are sold. Get ready for the fact that for such an activity you will need a lot of free time and perseverance.
You need the following materials and tools:
- the thinnest line you can find. Very often, bead bracelet patterns involve stringing beads on a strong thread. Of course, it’s up to you what will be more convenient to work with, but the thread may rot or break in the future and your product will be damaged. Therefore, it is best to find a fishing line;
- convenient capacity. You will pour beads into it and take them from there. You can use a plastic jar lid or something similar. The most important thing is that the beads do not spill out of the vessel;
- short and very thin needle. Some craftswomen do not use a needle, since the fishing line itself is quite tough. But if you are new to this business and are interested in how to make a bracelet out of beads, prepare a needle;
- scissors;
- locks. They are needed only for those bracelets for which the presence of a lock is necessary as planned.
Rules for weaving bracelets
To make your work satisfying and comfortable, and to make beautiful beaded bracelets, try to follow these simple rules:
- do not take a very long initial thread or fishing line. You can easily get confused in it and all the previously completed work will go down the drain;
- while stringing beads on a fishing line, look at how they lay down. The beads should not cling strongly to each other, but the beads should not hang too much either. In this case, the shape of the product will not come out clear, or vice versa - it will wrinkle and twist from high tension. Therefore, you should find the best option;
- we do not advise beginners in this business to immediately take on complex patterns of weaving beaded bracelets. It will be beyond their power and nothing sensible will come of it. First you need to practice on simple products, and only then do something more complicated. By the way, not always the most difficult will be beautiful. Many simple beaded bracelets turn out to be much more original and beautiful than those products that were made according to complex patterns.
Simple models of beaded bracelets
If you use the main beading techniques, you can make openwork, patterned, one-color or multi-colored jewelry and their technology does not seem too abstruse. But first you need to learn how to make simple models, fill your hand with this, and over time you will learn how to make more unique and complex bracelets. Therefore, first we will tell you how to make beaded bracelets for beginners.
Bracelet "Flower"
This is a very easy product to make. Take beads of two contrasting colors. A very good combination - black and white, such bracelets are always relevant. Take more white beads, it is needed for flower petals, and we will make its core from black beads. And if you are interested in how to make a bracelet out of beads, your actions are as follows:

The finished bracelet can be fixed with a lock, you can simply tie the ends of the fishing line. As you can see, there are very simple patterns for beaded bracelets; making such a product is very easy and fast.
Bracelet-harness
This beadwork is also very easy to make. The bracelet you make will have good stretch and feel like it's made with an elastic band. But for it you need to buy a lot of beads, since the beadwork of the bracelet of this model is carried out in a circle.
First, we take the beads of the same color and get to work:
- fix the tip of the fishing line and leave the tail;
- collect seven beads;
- now you need to make a ring, thread the needle into the first seed beads;
- hold the future bracelet and put one bead on the needle, then thread the fishing line through one bead into the bead that was the third. Of course, this requires a lot of patience, but you want to know how to make a bracelet out of beads;
- take another bead and thread this bead through one into the one that was fifth in a row;
- it remains only to tie the ends of the bracelet together.

The scheme of weaving the bracelet "harness"
You can make such a beaded bracelet for beginners and from beads of different colors. In general, all your imagination.
Multi-strand bracelet

Bracelet "Gift"
Take a fishing line and string four beads in a row on it. Pass the end of the fishing line through the first bead, and a ring should form. Then you need to dial two more beads on the fishing line and pass its end through the previously dialed second bead. It will be lateral in the dialed beaded ring. Next, put two more beads on the fishing line and thread it through the sixth bead. Repeat these simple steps until you have a thread of the required length.
Complex patterns of beaded bracelets
We figured out simple products and now we will try to make bracelets according to more complex patterns. But do not worry, and you will certainly succeed in these products too. Everything is not as difficult as it seems. Patterns for products can be invented independently. It is best to first put the invented drawing on paper and paint the beads there with the desired color, and you will see if the selected colors are combined correctly. Such a pattern of a beaded bracelet will help you not to get confused while working and do everything right.
Personalized bracelet
Your loved one will like such a gift, because everyone is pleased to receive something made by the donor himself. For a bracelet with a name, you will need beads of two different colors. The weaving scheme is called "Mosaic" or "Brick". You can use this type to make a decoration of any thickness and any pattern, and not just with a name. The bracelet will be thick, like a good strap. And if you are still interested in how to weave a beaded bracelet with a name, then the course of your actions is as follows:
Do you want something interesting?
- make a diagram of the product on paper. Paint over the beads with the name, the width of the product is ten beads;
- fasten the tip of the fishing line. String ten beads on it;
- from the last bead, return to the ninth in a row through the top and now the fishing line should look down;
- through the bottom, thread the end back through the last bead. You have made the first row of the bracelet;
- continue to weave the product to the end in this technique: take the first bead, thread the fishing line through the top into the eighth bead, into 11 (last) through the bottom and so on.
Do not forget to weave beads of a different color that you have chosen for the name into the product according to the scheme. You will get a very beautiful beaded bracelet, which will surely please your loved one or girlfriend.
Bracelet "Lace"
This product is a very wide woven strip, which we will decorate with a complex ornament in the form of interesting cross-flowers and multi-colored oblique stripes. On a similar arrangement of parts and according to the same scheme, you can make other types of bracelets, but we will figure out how to make lace bracelets from beads.
Use the following action plan:
- put 11 beads on a working thread or fishing line. Take 9 pink and 2 red beads;
- pass the needle through the hole in the 5th bead and tighten the loop;
- type 3 lilac beads on the needle and pass the fishing line through the first bead;
- to form the second link of the bracelet, put 4 beads on the working thread: 3 red and one purple;
- then pass the needle through the middle bead in the top row;
- now you need to put on a thread 2 red beads and one purple one and thread it into hole 10 of the bead.
If you are interested in how to weave a bracelet from beads further, then follow all further steps in a similar way, starting from the very first paragraph, and change the selected colors of the beads.
Bracelet "Crystal drops"
To make this bracelet model, you will need, in addition to small beads, larger faceted beads - 4-8 mm in diameter. This jewelry looks very original if you take faceted beads of various colors, and small beads should be solid. You also need to prepare a thin needle, fishing line or nylon thread, scissors and a clasp for the future bracelet. And if you are interested in how to weave a bracelet with the romantic name "Crystal Drops" from beads, your actions are as follows:
- cut off a thread about a meter long with scissors;
- at the end of the thread, fix one bead by pulling the thread through it twice, and then tighten it;
- string 6 beads and 1 large bead. Now we stretch the thread again through six beads. Ultimately, they will go around the faceted bead on one side;
- we will collect three more beads and 1 bead and now we need to pull the thread through 4.5 and 6 beads;
- then pull the thread through the beads that you typed last, and tighten everything.
Continue weaving the links of the decoration in the same way until you get the required size. At the end of the work, fasten the thread, attach fasteners on both sides of the product, and cut off the excess ends.
Now you know how to make bracelets from beads. There is nothing complicated here, you yourself saw this, the most important thing is patience and passion for this business, and then you will get original and beautiful beaded bracelets that you are not ashamed to give to friends and relatives.
A fashionable bracelet is an indicator of the owner's sense of style and taste. Such an accessory will complement any image and make it complete. The main thing is to choose the color and shape. After all, not every bracelet looks good on everyone. Therefore, you can make the most suitable thing for yourself with your own hands.
Fenugreek
The most fashionable bracelets now that you can make with your own hands are shambhala. Decide on a color that matches most of the clothes in your wardrobe and start choosing materials. What you need for work:
- Three meters of waxed cord.
- ten beads.
- Scissors.
- Colorless nail polish.
- Board and two nails. This is necessary for weaving. Drive nails into the board at a distance of 30 centimeters from each other, you get a machine. It can also be purchased at a craft store.
This set of materials is suitable for beginner needlewomen. Having learned how to weave a regular Shambhala bracelet, you can master more complex techniques.
How to make a bracelet
- Tie the edge to one nail
- Pull it to another nail, leaving an extra five centimeters, cut it off.
- String existing beads on it in the required order, starting after ten centimeters from the nail.
- Pull the cord well and tie it to the second nail.
- Cut 2.5 meters of cord. Step back two centimeters from the nail and tie through the center of the cut one. That is, the edges from the node should be the same length.
- It should turn out so that the left part sticks out higher from the node. We start weaving with it. Pass it under the main thread and over the right.
- We draw the right part above the main one and under the left one.
- We tighten. The result was a node that will be used throughout the work.
- If you did everything right, then the right side sticks out higher.
- Now the right segment passes under the main thread and above the left part.
- The left part is above the main and under the right cord.
- We tighten. Weave twenty knots according to this plan.
- You have almost learned how to weave a fashionable Shamballa bracelet. Now we add a bead to the usual knot. We braid it.
- After the three base knots, another one with a bead follows.
- Keep doing this until you run out of beads.
- Weave fifteen more basic knots.
- Remove the bracelet from the machine. Stepping back five centimeters from the base knots, weave two simple knots on the main cord. Cut off the rest.
- Lubricate the last knots with prepared varnish.
- To make a comfortable adjustable fastener, you need to close the edges of the main cord into a circle. We direct the ends of the cords with knots towards each other. With the ropes that did the main work, we make five basic knots.
- Make simple knots on the remaining cord, cut off the rest. Lubricate with varnish.
You have learned how to make a simple version of the Shamballa bracelet. Experiment with bead diameters, colors, and even the number of rows.
fashion trend
Fashion is very relevant now. Do not be afraid of a large number of them, wear them on both hands, but make sure that the accessories are combined with each other in shape, texture or color. Use large sizes. How to do it? You will need an ordinary plastic bottle for the base and improvised materials for decoration. It can be a fabric of different textures, rhinestones, threads, paint, varnishes, brooches.

Progress:
- Cut out a four-centimeter-wide bracelet from a plastic bottle.
- If the bottle is colored, and you are going to work with a transparent material, then glue the base
- Take a fabric with a design that suits you. Cut off a flap that is one and a half centimeters larger than the base on each side.
- Glue a bracelet on them.
- To trim the inside of the bracelet, use masking tape.
- Cut out another strip of fabric and glue it inside.
- Sew or glue beads, stones, rhinestones.
A lace or guipure accessory will look very gentle. You don't need to add extra details to it. This fashionable bracelet is notable for the fact that it requires minimal money and time. Each dress can have its own unique decoration.
Ethnic style
What bracelets are fashionable for more than one season? In ethnicity. They are easy to make from felt and floss threads matching it in color. Commonly used red, black, yellow, orange, burgundy, brown, white. As an example, take the felt of the last three colors and suitable threads.

Progress:
- Measure the circumference of your wrist and add three centimeters. This length should be the product.
- Draw circle patterns on paper. Two will be 4 centimeters in diameter, four will be 3, they are used for the base. Only half will be visible, the rest are needed to hide the wrong side. And cut out a few smaller circles for decoration.
- Embroider a pattern on the smallest details, thus attaching them to the middle ones. It can be stitches and zigzags.
- Now connect the middle parts with the largest ones in the same way.
- Collect the bracelet. A photo of the finished product will help with this. Fold pairs of circles and connect with a decorative stitch.
- Fasten the pieces to the sides.
- For the fastener you will need two burgundy rectangles and a white one. The last one is a little shorter, make a hole in it for a button
- Sew on a button.
The work is over. You can come up with different versions of this bracelet by changing the shape of the felt.
Polymer clay
Polymer clay is an excellent material for making a bracelet in ethnic style. Here you can use any colors, patterns and shapes. For work, you will need stacks for plasticine and improvised materials. Twist the bundles, make circles, squares, semicircles, leaves. Try any size. The bracelets are thin, so you need to make several of them at once and wear them together. The material is comfortable and supple, takes shape well, so it will not be difficult to work with it. It can harden in an oven or on its own.

Men's accessory
Fashionable made with love, will be a gift for a young man, friend or father from a girl. After all, the strong half is not fond of needlework. You can make such a thing according to the technique already known to us, used in weaving a Shambhala bracelet. Just don't use beads. For a man, a wider bracelet is suitable.
Materials:
- Lace or rope. You need to calculate as follows: per centimeter of the bracelet is 13 centimeters of cord. That is, for a 20-centimeter wrist, 2.5 meters of material is needed.
- Scissors.
- Buckle.
- Lighter.

Progress:
- Tie a knot at one end of the buckle so that there is the same length of cord on either side of it.
- We pass the ends into the second part of the buckle. A cord should be stretched as long as a man's wrist.
- Bend the edges of the cord so that you can weave according to the principle of a Shamballa bracelet.
- We skip the left part of the lace under the main threads and above the right part.
- The right thread above the main and under the left.
- Continue until you reach the second part of the buckle.
- Solder the ends to the product with a lighter.
Leather bracelet
To please your man, learn how to make fashion bracelets with your own hands. MC will help you with this. Take a piece of leather and a clerical knife. Progress:
- Cut a rectangle out of leather 3 centimeters larger than the desired size of the product.
- Draw a drawing with a clerical knife.
- Draw simple parallel lines that will later become weaves.
- Cut the design on the skin by about a third of the thickness.
- Cut the strips along the entire depth.
- Tie them together and secure with a stick.
- Punch holes along the edges for fastening.
- Put the bracelet on the jar for ease of use.
- When finished, boil the bracelet along with the jar. At this point, the accessory will take the necessary shape, and the pattern will look like a carving. The boil lasts three minutes.
- Cool the product, correct the defects. Wrap the protruding sides of the skin with a cloth.
- Polish the bracelet with sandpaper and coat with shoe cream of a suitable color.

Basic Techniques
The simple techniques described above will help you create a unique trendy bracelet for yourself and your boyfriend. If you are a creative person with time and a good imagination, then be sure to try making an accessory with your own hands.
Of course, you can choose a ready-made bracelet as a decoration, but today “stamped” jewelry has gone out of fashion, and everything is used. O exclusive things are gaining more popularity.
A handmade bracelet is always fashionable, exclusive and original. Such a little thing will emphasize your style, and you can make exactly the decoration that you dreamed of!
Our topic today is about creating beautiful bracelets with your own hands. At first glance, it is difficult, but we will prove to you that things are much simpler!
1. Leather bracelet
Leather is a noble material, wear-resistant, and easy to process. So, from a piece of leather you can easily make a romantic bow bracelet.
You can buy a piece of leather of any color for making a bracelet at. We have detailed for you, on eBay and the item.
So, we measure the volume of our wrist, and cut off a part 4 centimeters longer (approximately) from the flap. Round the edges of the bracelet and insert a button into it, which will serve as a clasp. Strictly in the center we collect the bracelet into a bow, and sew it with a small piece of material. The bracelet is ready!
For its individuality, you can add a rhinestone to the bracelet. We have found a chic assortment of iridescent stones for you.
2. Several bracelets in one
Very often, celebrities dictate fashion to us, and judging by the latest releases, multilayer bracelets are in trend. When you put a lot of thin bracelets on one hand, it is elegant and bright!
But today it's all about originality. Therefore, we suggest that you take over the baton only partially. To do this, you will need all the same medium-sized bracelets that you can beautifully interlace into one and get an exclusive model.

So, first you need to buy a set of bracelets! Choose the color, shape and width of your choice.
Different bracelets can be ordered in the online store for hand made. You will also need a satin ribbon. A huge range of plain satin ribbons and prints can be viewed in the online store.
Now it remains only to twist the bracelets together with the help of this very ribbon.

Girls love everything delicate, and a bracelet with a bow is a great option! Several identical or even different bracelets, depending on how you like it, can be tied with a ribbon and secured with a bow.
Even bracelets that you decide to tie with a ribbon can be made by yourself by stringing different beads on a thin elastic band or wrapping a silk ribbon around the smooth rim of the bracelet. It's fast, easy, but effective.
Many beautiful beads for bracelets can be bought in the online store.
3. Shambhala
The fashion for Shambhala jewelry began last summer, but over the year it has not gone away, but on the contrary, it has only intensified! Celebrities are happy to demonstrate Shambhala bracelets from their collection at important events.

Of course, a lot of the same type of jewelry is sold in stores, but as we said earlier, a self-woven bracelet can be made exclusively to your liking, satisfying your creative desire one hundred percent.
Shamballa can be woven from special beads for her, or from any - those that you like, fit your outfit.
You can order a beautiful variety of beads on the Alibaba online platform. and - the choice is yours.
The principle of weaving Shambhala is simple:

4. Bracelets made of natural stones

Natural stones are a valuable material, and it looks expensive and elegant. In the store today, the choice of such bracelets is wide.
You can present your own bracelet in any form - you can simply string natural or artificial stones on a thread, or you can add various pendants to this combination.
Sets of natural stones are available for free sale, and many beautiful pendants made of precious metals are sold in.
5. Vintage splendor

Vintage is a special trend in fashion that not everyone understands. But those of us who accepted it were able to appreciate all its splendor.
A vintage-style bracelet is not easy to make, but it's worth it.
For this you will need:
- Bracelet base. It is best done using the papier-mâché technique. It must be flat.
- Next, we need a piece of lace. Decorative lace can be bought at the site.
- Satin ribbons.
- A beautiful bead. It is better to take Czech - then each bead will be the same size and without flaws. You can order such beads at an affordable price at.
- Hot glue gun available