Upcoming 2020 New Year- the right time for our children’s cherished desires and dreams to come true, and winter holidays, especially masquerades and carnivals, provide a wonderful opportunity for this. Haven't you decided yet what outfit your daughter will wear to this party?
Many schoolgirls really like the image of the Snow Queen - the heroine of the famous fairy tale by Hans Christian Andersen, as well as many cartoons and films. You can make this outfit for a girl with your own hands. We'll give you some ideas.
The Snow Queen's costume is easily recognizable. Its general color scheme can be white or blue. You can decorate it with details of the same color, or you can choose slightly different ones, for example, silver-gray, and as a result it will look more impressive.
DIY Snow Queen costume for a girl for 2020 New Year
Satin, silk, guipure, brocade, organza, tulle and other fabrics are suitable for this outfit. A Snow Queen costume for a girl can consist of a dress with fur trim. Can also be decorated long dress snowflakes, rain, white beads, sequins and rhinestones.
Another option is to sew a blouse decorated with sequins, tinsel or beads, and to go with it a tutu skirt made of light silver tulle.
The Snow Queen's masquerade costume may also include a circle skirt. You can make a skirt pattern as follows. Draw two circles on the fabric - an inner one (for the waist) and an outer one, making allowances for the seams. Cut out the circles, fold the hem and sew. Fold the belt 2-3 cm, sew and insert an elastic band into it. To make the skirt full, sew a petticoat from white tulle.
For the semi-sun skirt, you will need to cut two pieces of fabric. Sew them, fold the top edges, insert the elastic, tightening it a little, and sew.
Using this pattern you can sew not only a skirt, but also a cape for this New Year's masquerade costume. Sew a decorative snowflake made of plastic or fabric onto the front part of the cape in the chest area, which can be decorated with mother-of-pearl beads, sequins, rhinestones, etc.
Trim the edges of the skirt and cape with faux fur or shimmering Christmas tree tinsel - and your daughter will be irresistible in this outfit. After all, this is a carnival costume, it should sparkle to match the decorated Christmas tree!
The bottom of the cape and dress can be decorated with snowflakes - for example, with a pattern that includes the following alternating elements:

To this outfit you can add a wide belt decorated with a similar pattern.
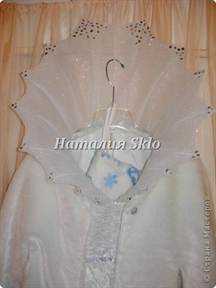
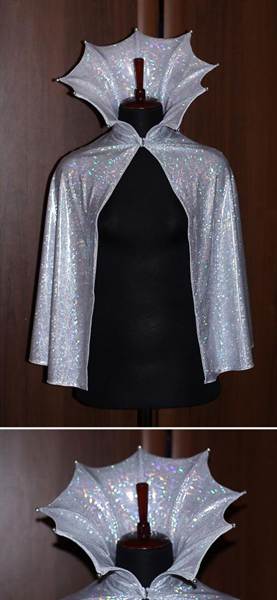
One more element carnival costume Snow Queen for a girl - a cape made of transparent fabric, decorated with sparkles, white faux fur or silver tinsel. It can be long, like a raincoat, or it can be short - up to the shoulder blades or the middle of the back. Sew a stand-up collar to the cape, which will keep its shape well thanks to the non-woven fabric.
The collar can also be strengthened using a frame in the form of a trapezoid made of thin wire, which is used by florists. It needs to be covered on both sides with material, decorated with lace, beads and sparkles.
Or you can sew a stand-up collar directly to the dress. It is most convenient to make this part from light but durable tulle. This is easy to do: cut two strips of the desired height. Sew them together and gather them from the side of the neck, sewing a strip of fabric horizontally and stretching a regular elastic band along its edge.
To make the collar more rigid, lay several vertical stripes with regiline - and you will get a design that resembles a fan. Now all that remains is to carefully sew the collar to the dress. You can decorate this detail with beads or sequins.
Gloves, which you can buy or sew yourself and decorate with embroidery, sequins or white fur, will add elegance to the suit.
For the Snow Queen costume you will also need a crown, which you can also make yourself. It can be made from cardboard, pasting it with white satin and attaching rhinestones or pieces of unnecessary disks to it.
Or you can attach to a white hair hoop a large crescent cut out of cardboard, painted with silver or covered with the same material from which the cape was made.
For the month you need to stick miniature snowflakes cut out of foil, fragments of “rain” or tinsel, beads, etc. A transparent veil, also decorated with sparkles, is placed on top of the “horns” of the month.
A crown decorated with white beads or semolina imitating snow will also look great. Semolina or beads should be poured onto areas coated with glue and left for several minutes, and then shake off the remains.
You can make a crown using the quilling technique - from rolled paper strips of white or blue color, which are glued to the hairband and decorated with glitter. Finally, the crown can be crocheted using fine white yarn and then starched to ensure it holds its shape well.
And the image of the Snow Queen will be completed with a beautiful mask made of cardboard, papier-mâché, leather or fabric. You can use ready-made stencils, or you can draw it yourself, with your own hands.
Masks made of thick cardboard are made according to the following principle:
- With reverse side paper draw the outline of the mask and indicate places for the eyes,
- cut out the contour of the mask and holes for the eyes,
- glue the tape on both sides of the mask.
You can make holes in the sides of the Snow Queen mask and attach an elastic band to it. If the girl does not put on the mask, but only brings it to her face, holding it in her hands, you need to glue a stick or wooden skewer to this product. Don't forget to decorate the mask with sparkles, beads, bird feathers, embroidery, ribbons, rhinestones and other decorative elements.
All you have to do is apply makeup to the girl’s face - silver or blue pearlescent shadows, lip gloss and decorative skin gloss - and the image of a brilliant snowy beauty will be completed.
Your baby has her first ever New Year's party? Or is this her favorite event that she waits for all year? Or maybe you are going to celebrate a costumed New Year with your family and friends? In any case, she should look great, and for this, make her a costume for the New Year with your own hands!
Christmas tree costume
A win-win solution for the New Year is a Christmas tree outfit. There are several options here, depending on your skills and preparation time. The simplest option is to take a purchased green dress/sundress as a basis and attach tinsel and “toys” made of shiny fabric – balls and stars – to it.
We complement the look with white tights, add something green (for example, a bow or a hairpin) to the hair - and everyone will already understand that this is a Christmas tree. But if you want a more spectacular suit, you will have to tinker. For example, you can wear just a white T-shirt on top, and a tulle skirt with it.

It’s easy to make such a skirt for a New Year’s costume for girls with your own hands - you need:
- tulle (can be in several colors, for example green and white);
- scissors;
- wide elastic band or ribbon.
Manufacturing process:

The Christmas tree costume can be complemented with a cap made of green satin or a headband, which will be decorated with a star made of foil. You can also make a witch-type hat for the Christmas tree and decorate it with green tinsel.
Fox costume
Traditional character winter tales and a welcome guest at all matinees is the cunning fox. It’s also easy to make such a DIY New Year’s costume from a piece of red felt or other “fluffy” fabric.

In addition, let's take:
- scissors;
- tailor's chalk or pencil;
- felt white for the tail and chest (ideally pieces of white fur);
- a sewing machine (or we make do with thread and needle);
- filler (sintepon or other).
Manufacturing process:

The fox's look will be complemented by black tights or leggings, gloves of the same color and a nose drawn with a cosmetic pencil. You can sew a do-it-yourself squirrel costume for the New Year for a girl in much the same way, except that you can attach tassels made of black fleece cut into “noodles” on top of the ears.
Snow Queen costume
What girl doesn’t dream of becoming a queen, even just a little bit, even of an icy country? Costume Snow Queen The easiest way to do it is on the basis of a white or silver dress (preferably floor-length). An excellent option is to sew a skirt from light silver tulle, and under it wear a T-shirt or blouse decorated with sequins, tinsel or beads. You can wear white tights and sandals under the dress.

However, so that Her Majesty is not confused with a banal Snowflake, you need to sew a cloak with a stand-up collar and a royal crown. First you need to sew a regular long cape without a collar, then separately make a pattern for the future collar for a suit with your own hands for the New Year for a girl. Then we take a transparent fabric like tulle, fold it in half and cut out the piece to the size you need. You will need to make lines in it in order to then fix the crossbar or corset mustache there to fix the collar. The main fabric is stretched on top and stitched on the sides; then the stand-up collar is sewn to the cape, for security by sewing a thick braid or strip of fabric to the reverse side.
The Snow Queen's crown must be gorgeous! Usually a diadem headband is used as a basis. You can make a crown for a New Year's costume for a girl with your own hands using the quilling technique - from twisted paper strips of white or blue, which are glued to the headband and decorated with sparkles. You can simply cut it out of paper or thin cardboard - this material allows you to show your imagination and make a beautiful openwork crown. You can make a wire frame and stretch fabric over it. Finally, the crown can be crocheted. Don't forget to decorate it - this can be done with sequins, rhinestones, beads, lace or sparkles.
An original version of making a crown for the Snow Queen is offered by Natali Iolkina in a video master class
Rapunzel costume
However, girls often like to be kind princesses. For example, such as Rapunzel. This image is also recognizable: a floor-length purple dress, a luxurious braid... The easiest way is to buy a ready-made dress (it’s good if it’s made of satin, organza or other shiny fabric) and remake it yourself. On the front of this do-it-yourself New Year's costume for a girl, you need to sew lacing, like a princess from a cartoon, and make the sleeves ruffled (to do this, we sew shortened sleeves to the dress, take the width with a margin, and then insert an elastic band into them). Additionally, we decorate Rapunzel’s dress with lace and decorative braid.
But not every girl can boast of luxurious, heroine-like hair - which means you need to do it yourself.
The described method is quite labor-intensive, but the braid turns out gorgeous. So, we need:
- old children's tights (preferably white, yellow or beige);
- a lot of thick yellow yarn;
- hook;
- scissors;
- needle and thread.
Manufacturing process:

This method of creating a hairstyle is also suitable for Malvina’s hair - by the way, another popular one new Year costume with your own hands for a girl. For the image of Malvina we need blue or blue dress, decorated with lace, and pantaloons. They are sewn from white short pants or cut-off leggings, simply trimming the bottom with lace. Malvina's head is usually decorated with a huge bow.

Malvina’s wonderful skirt will come out of the same tulle; it can also form the basis for an Alice in Wonderland outfit. “Alice” can additionally be sewn with a white lace apron with an applique in the form of a card suit, put a decorative headband or bow on her head, and white or striped knee socks on her legs.
Celebrating the New Year often leads parents to a dead end, because more and more often kindergartens and schools hold costume parties. themed parties. Kids are dressed up as bunnies, musketeers, fairy tale heroes, and the little ones turn into a round dance of snowflakes. Older children are offered to choose more serious costumes, for example, the snow queen. Buying a suit (especially at the last moment) is not so easy - it costs quite a lot, and often there are no suitable sizes. To get out of a difficult situation, we suggest you make the main attribute - the collar of the snow queen with your own hands. It will help complement the image. All you need is an elegant white dress, which almost every girl has in her wardrobe.
The same applies to adult costumes, and what if you want to try yourself in the image of a cold queen or happen to spend a holiday in an educational institution. A luxurious collar will make your look truly alive, and they will help you create it detailed instructions from this article.

What to make a decoration from
So, your task is to create an accessory for a carnival costume. What can it be created from? The Snow Queen is a heroine of folklore with a luxurious dress equipped with a high collar. Task number one is to create a product that can last in a standing position at least until the end of the holiday.

For these purposes, you can starch the fabric or use a wire frame. No less effective method give rigidity to the product - corsage tape or corset mustache. These materials are easy to purchase at a sewing store.
Having decided on the base, you can select the appropriate material. It must certainly be light and delicate, but at the same time have a special density. An excellent option would be to use tulle, floral mesh, even ordinary polyethylene or a piece of openwork lace will do. A little work on the decor of the accessory, and it will turn you into a real fairy-tale heroine.
You can see some design ideas in the photo:


The simplest option
Starch paste will help you create the simplest collar for a carnival look with your own hands. . For the product you will need:
- a piece of thick lace;
- a pattern or an old collar from a dress of a suitable size;
- pencil;
- a little potato starch, water.
Try the pattern or old collar on the neckline of the dress, make sure the pattern fits, and make changes if necessary to suit the desired result.
You can use any pattern:


Place the lace on a flat surface and transfer the template using tailor's chalk. Carefully cut out the piece, capturing the motifs of the openwork material for greater impact.
Cook potato paste from 2 tablespoons of potato starch added to a liter of boiling water. Pre-dissolve the powder in a small amount of liquid so that there are no lumps.

When the solution has cooled to room temperature, place a piece of fabric in it for 5-7 minutes.

The removed collar must be carefully wrung out, straightened and waited a little for it to dry. Gently iron the damp product through a layer of fabric at medium iron temperature, and at the same time give it a curved shape. Can be used instead of lace crocheted old collar from a dress. Decorate the resulting product with rhinestones and beads.

In the old days, real queens complemented their look with such standing openwork collars.

Polyethylene and mesh
Take a look at the accessory of this luxurious fairy-tale heroine. Ordinary transparent polyethylene or the use of a coarse mesh will help you achieve such lightness. To get started, we suggest you familiarize yourself with the step-by-step master class.

So, you will need:
- wire;
- pliers;
- film for packing flower bouquets (can be used with suitable pattern) or floral mesh;
- white floral ribbon;
- decor – half beads, beads, rhinestones;
- glue "Moment Crystal".
Create a wire frame. To do this, measure the collar of the dress, adding 1.5-2 cm. Bite off a piece of wire of double length, twist it into a tight rope. Make the stiffening ribs, setting aside the required number of wire “knitting needles”. They can be either the same length or vary in height, but it is important to maintain the symmetry of the opposite knitting needles.

Wrap white tape around each rib to hide the metal. Place long knitting needles on the back side, and decorate the neckline of the dress with short ones. Give the workpiece the desired shape and cover the frame with film, fixing it with glue where necessary. Do it differently with the mesh - carefully sew it to the frame with small stitches.

Lay a layer of shiny transparent fabric on top and also sew it to the stiffeners. Carefully sew the top edges of the mesh and fabric between the knitting needles, forming beautiful valleys. Decorating the ribs with decor will help hide minor flaws in the work and add more realism to it. Use half beads, beads, sequins, rhinestones. A CD cut into small pieces will help you make ice shards. Show a little imagination, and your accessory will be a wonderful addition to the image of the snow queen.

Corset mustache and regilin
A corset mustache consists of halves of plastic tubes that are inserted into the drawstring of products to give them rigidity.
At the New Year's carnival celebration, girls often play the role of a snowflake or snow queen. If for the first case it is not difficult to choose an outfit, then in the latter case the problem of finding an appropriate headdress may arise. Unfortunately, a beautiful crown for the snow queen is rarely found in stores. Therefore, you usually have to make it yourself.
Ice accessory
This crown has a “candy” effect due to the use of non-standard material.

To work on the product you will need:
- transparent PVC film or plastic (you can take old document covers);
- tulle with silver pattern;
- cardboard;
- shiny fabric (silver look);
- thread, needle;
- scissors;
- thin wire;
- silver braid;
- elastic band 2 cm wide;
- hot glue;
- decorative elements (for decoration).
First of all, the circumference of the head is measured. Based on the obtained measurement, you need to calculate the width of the base of the vertices of the future crown. There are seven of them in the product.

The height of the triangles is selected individually. You just need to take into account that the central triangle will be the highest. The parts adjacent to the central part are cut 2 cm shorter than the main part. The next two triangles are 2 cm lower than the previous ones, etc. Based on the principle described above, 7 triangles are cut out of PVC film. The same parts are cut out separately from tulle.

A corresponding tulle detail is applied to each workpiece. A wire is sewn along the edge of the blanks using an overcast stitch. All triangles are framed with silver braid. It is advisable to bend the figures slightly so that they hold their shape better. The finished transparent parts are assembled with elastic. It is most convenient to do this on sewing machine. The ends of the product are connected into a ring.

To create a volumetric effect, you need to complement the crown with opaque elements. To do this, two triangles are cut out of cardboard. Since these parts will be located on the front of the crown, their height should be slightly lower than the transparent triangles.
Cardboard blanks are covered with shiny fabric and secured with safety pins to the front “ice pieces” of the crown, as in the photo.

Dense and transparent parts are attached to each other. All that remains is to decorate the crown to your own taste. You can use rhinestones, beads, sequins, and lace elements in your work.

The royal ice accessory is ready.
Quick option
Advice! It is quite possible to make a crown faster if you do not cut out each tooth of the product separately, but use the continuous pattern technique.

To do this you should prepare:
- cardboard;
- fabric packaging for flowers;
- scissors;
- elastic band;
- silver braid;
- silver paper;
- threads;
- glue;
- sequins in the shape of snowflakes.


A crown template is drawn on cardboard. The workpiece is cut out. The pattern is placed on the fabric and traced taking into account the allowances.

The fabric part needs to be cut out, then placed on a cardboard mockup. The allowances are folded over to the reverse side and glued to the cardboard.

Glue is applied to the underside of the workpiece, after which the crown is glued onto silver paper. This hides unsightly allowances on the back of the product.

The crown is carefully cut out. The product is decorated with large sequins in the shape of snowflakes.

The outline of the crown is framed with silver braid. Depending on the quality of the braid, you can glue it with hot glue or sew it on yourself.


The crown is ready. If the holiday is just around the corner and you urgently need to acquire a “snow” crown, then you can try a simplified version – a product made from cardboard. To prevent the crown from looking like a “hurried craft,” it is advisable to replace the cardboard with a piece of light wallpaper with a pattern.

A model of the crown is drawn on it. The template needs to be cut out.

Then the workpiece is painted with silver spray paint. Since the aerosol tends to be sprayed in all directions, it is recommended to provide for this moment and carry out painting in the corridor, having previously covered the floor with newspaper or polyethylene.
First you should paint the back of the product. On the front side you need to carry out two stages of staining. After applying the first layer, you need to dry the product and repeat the coloring.

When the crown has completely dried, you can begin decorating it. The edges of the product are decorated with edging with rhinestones or any silver braid. The crown is decorated with additional elements corresponding to the theme of the carnival costume.

The final step is to sew a wide elastic band along the edges of the product. You need to measure the elastic so that the crown fits tightly around your head.

The carnival headdress is ready to delight its owner. Any proposed master class will allow you to create an accessory not only for a child, but also for an adult. This is especially true for kindergarten teachers and directors of theater clubs.
Video on the topic of the article
A video selection will help you better understand the process and make the product faster.
On the mannequin, mark the collar line of the dress with chalk. Along the line we build the frame of the future collar from wire (I made long loops and then twisted them, it turned out strong and even). The number and height of the rods is arbitrary, according to your taste and sense of harmony. My task was to make them gradually increase from the center of the neckline to the neck. It is necessary to ensure that the opposite wire rods are the same length and the collar is symmetrical.
To prevent our model from moving, we attach it to the mannequin with pins. Along the line of the collar itself, from the outside, we twist the wire into rings; later a coarse mesh will be sewn onto them (cut an oblong rectangular piece from the mesh, with a good margin). These “rings” will subsequently ensure a secure fit of the collar to the neckline of the dress.
![]()
We wrap each protruding wire “thread” with masking (paper) tape. This will hide the metal, because our collar should be translucent and white.
![]()
We pin the mesh to the rods, making bends on the material so that the mesh fits the frame freely over the entire area and does not wrinkle anywhere. We cut off the excess mesh on top, focusing on the tops of the rods, leaving 1 cm of margin (just in case).
Unfortunately, I didn’t film the next stages, because... I haven’t discovered the Country yet, so I’ll just describe the actions:
You need to remove the mesh with pinned folds and carefully cut off the excess. Unravel the folds, lay them out on the table and use this “pattern” to cut out 1 more piece from light translucent material. Do not mix up the sides (left and right), because... Even if it seems to you that the frame is symmetrical, your eye may fail you. :-)
![]()
Again we pin the mesh to the frame from the wrong side. And we sew it to the rods, grabbing sequentially the mesh and the wire rod. There should be no sagging between the collar sections.
![]()
Now we perform the same operation with transparent fabric, only from the inside.
When both pieces of fabric are firmly sewn to the frame, you can work on the “points” of the collar. Mark with pins the line of “hollows” between the rods and sew them with small stitches with white thread. Then trim off the excess, retreating half a centimeter from the edge of the mark. In this photo you can see that one half has already been trimmed, but the other has not.
![]()
For decoration, we will imitate fragments of ice on the corners of the collar. I took the unnecessary disk and cut it into pieces with ordinary scissors. Be careful - the disc may crumble and fragments will fly in different directions; they may be picked up by animals or children. Therefore, it is better to perform this operation with wire cutters and in isolation from unreasonable and overly curious creatures.
Then randomly glue the pieces onto the tops of the collar.
![]()


