Let's see what ways you can create unique New Year's crafts for a competition for school or kindergarten in the form of Santa Claus. I will also show you how to beautifully decorate gifts for the New Year with the symbol of Santa Claus. Let's start with gifts...
Santa Claus on a gift
How to do it yourself.
(simple options).
Here in the photo below we see an excellent New Year's decorations the most ordinary gift packages made of gray wrapping paper.
For the first idea you will need:
- a round shape made of white cardboard, a piece of red cardboard,
- red pompom (or regular cotton wool + PVA glue + red gouache)
- a piece of white foam packaging interlayer (which is often placed in boots in the store, or in boxes with equipment). Or (if you don’t have such material) you can take white cardboard and cover it with cotton pads.)

On a white round cardboard eye shadow or blush Draw spots on the cheeks and black beady eyes with a marker. In a bowl, stir red gouache and PVA glue (a couple of drops of paint per teaspoon of glue); dip a piece of cotton wool into this mixture. We form a ball from this sticky red cotton wool with our hands and dry it on a radiator (it will dry overnight).
Cut out a triangle-cap from red cardboard. We glue it to the edge of the white round piece (Santa Claus's forehead) - it is better to glue it dry, that is, use a glue stick or double-sided tape, since wet PVA glue will wet the cardboard and make it bend.
On top of the connecting line (between the hat and the head) we lay a “fur edging”, as I already said, it is better to cut it out of foam packaging material. Or cover the cardboard with cotton pads and cut out the edging of Santa Claus’s hat from such “cotton-shaggy paper”
And here two more ideas craft pendants in the form of Santa Claus - already from just cardboard... and cardboard with paper cupcake tins.

Here are the large bags with large size Santa Claus.

You can even make a package yourself from a sheet of gift paper. The template here is very simple. You can make such a drawing yourself with a pencil, cut it out, bend it along the fold lines and you’re done. A beautiful box - glue the face and beard of Santa Claus to it and you're done. 
You can make your own from cardboard (or from soft felt, or formiam as in the photo below) make PACKAGING POCKETS for gifts, decorated with an applique of Santa Claus on top.

Here is a diagram of such a pocket made of colored paper or cardboard. We bend along the lines, glue the sides and the container for sweets and chocolates is ready.

All that remains is to glue on top the head of Santa Claus with a beard and a hat. Simple and fast, no complexity. You will love making these quick pocket crafts with your own hands with Santa Claus, a snowman, angels and other New Year's characters.

Here is a pocket package made of soft felt or fleece, which is suitable for gifting a smart phone, or jewelry. It will be nice to receive such a gift, decorated manual labor and the imagination of the donor.

Santa Claus WITH CANDY
(just do it yourself).
Here's another new craft for this year. Santa Claus hides a candy in a bright wrapper in his tummy. A simple children's craft that you will quickly understand and can do with your own hands in one sitting.

As you can see (in the photo below) there is nothing complicated or tricky here. It’s just that the tummy and back of Santa Claus are a FULL DETAIL - in shape it looks like a FIG. which has a hole only in the upper turn of the number.

This “figure eight” is bent in half - and we get a tummy with a hole in the center in the front and a closed back at the back. At the top we fix our halves with a drop of glue, or a stapler or tape. And all that remains is for our Santa Claus to glue on the head with a beard and the legs-stand.
Santa Claus do it yourself
Craft using the spider web technique.
There is an article on our website where I show in great detail how to make these balls with your own hands from glue threads and a small balloon. In this article “Balls of thread and a sea of crafts using the spider web technique,” I posted a master class. Therefore, I will not explain in detail here, so as not to waste unnecessary words. Follow the link, everything is explained there.
Just look at the photo below and fall in love with these cute New Year characters made from yarn balls. Simple and fast. In one evening we make balls, in the second evening we cover them with pieces of colored paper - and the craft is ready and worthy of going to the New Year's exhibition to school or kindergarten.

You don’t have to cover the balls with paper parts, but just put a cap like this on the top ball - where a face with a mustache and beard is already glued to the cone-hat.

In general, such cardboard caps (from the photo above) can be put on ordinary white inflatable balloons. And you’ll get a quick craft for New Year in the form of Santa Claus. Such quick crafts are convenient. (By the way, the link contains a lot of quick ideas for crafts for decorating a New Year’s office).

DIY Santa Claus.
Balloon craft
using papier-mâché technique.
You can make such a pot-bellied, big-nosed, sweet and charming Santa Claus from the cheapest materials. PVA glue + white paper napkins + balloon + gouache for coloring.

What is the secret of the SIMPLICITY of this Santa Claus craft.
The papier-mâché technique is very simple. If you mix a paper napkin with PVA glue and mold something out of this mixture and dry it, we will get a dense, almost wooden, hard craft.
This principle of creating a durable material from fragile paper and liquid glue became the basis of the Papier-mâché technique.
Instead of white paper napkins, you can use regular NEWSPAPER. But then you will need to paint it on top with white paint (acrylic or gouache) before drawing Santa Claus on it.

What do we do.
Step 1 Let's buy a balloon with an elongated tail (that is, pear-shaped). Let's inflate it so that it retains its slightly elongated pear-shaped shape. Turn the ball upside down and insert it inside the vase (to make it easier to work with). You can even tape it a little to this vase so that it doesn’t jump out of it.
Step 2 Tear the white napkins into shreds (or leave them whole, whichever is more convenient for you). We coat part of the ball with PVA glue and place a white napkin on this puddle. On top of the napkin, again apply PVA glue with a wide brush and again place the napkin on this wet place. Thus, we glue the entire ball in several layers - generously pouring glue and generously laying down layers of napkin. Let it all dry (overnight).
Note – you can cover the ball with newspaper, dry it and paint it white. Or start the first layers from newspaper. And the last upper layers should be made from a white napkin, then there will be no need to paint in White color.
Step 3. We crumple the napkins into large lumps - these will be tozhki. We also pour glue over it, and we also cover it with napkins, forming a wet crust of papier mache. We also leave it to dry.
Step 4. We take the ball out of the vase-pot on which it stood. We turn it with its tail up (we will cover this empty space that was in the vase with Santa Claus’s hat, it will not be visible. Using a marker on a dry round paper surface of the ball, we draw the silhouette borders of all the elements of Santa Claus - a face with a nose, a beard, a fur coat. We decorate this with gouache round decoration. Don't forget to glue the legs.
Note. For papier mache you need a lot of PVA glue. If you buy it in the stationery department (where the glue is in small tube jars) you will overpay 5 times the cost. Better and It’s cheaper to buy PVA glue in liter buckets in the construction departments of the store. For one liter of glue you will pay about 2 dollars. And such a bucket will be enough for you for a whole bunch of crafts. Any PVA glue labeled “universal” or “construction” will suit you. In composition, it is no different from ordinary school stationery PVA glue. The manufacturer can be any company. With this bucket you will not only make Santa Claus from papier-mâché, but also a snowman and a penguin (also based on balloon). Details in other articles on this site.

By the way, based on the BALLOON, you can make a variety of crafts with Santa Claus. You can decorate a ball covered with newspaper with strips of colored fringe. We buy rolls of crepe colored paper from the stationery store. cut it into strips, cut them into fringe, paste the BALL IN A CIRCLE with fringed stripes. It turns out another version of the Santa Claus craft with your own hands - mischievous and shaggy.

Or you can decorate a balloon covered with newspaper with a FLEECE WRAP - the soft material will make a very cozy and warm craft. 
Making our own Santa Claus
from stones and natural materials.
Ordinary stones - small or large river cobblestones can become the basis on which a New Year's fairy tale will grow.
You can simply find oval stable stones (or make them stable using play dough). Cover the stones with white gouache (spray with hairspray to fix the color and prevent it from staining your hands). Then draw all the lines of the future Santa Claus on a white background. Decorate each drawn sector with gouache. And then once again draw clear black boundaries between the elements of the drawing - make outlines with a black marker. Markers work great on rocks. It is best to use a marker for signing CDs - it does not wash off and does not stain your hands.

You can depict any New Year's theme on suitable flat stones. An article-lesson on creating beautiful New Year's drawings is already on our website “Family Heap”.

And from several stones (also painted with gouache) you can put together a whole plot applique on a single background cut out of plywood.

We buy a small sheet of plywood at a hardware store (or find a suitable one in a pile of trash near the entrance). We cut a round piece out of it. We tint with ink the color of snow and the color of sky. And against this background we lay out Santa Claus, his sack, his reindeer, his sleigh... whatever.
Please note that the stones perform only one part of the element - the rest are painted with paints, laid out from twigs, ropes and other natural material.

It is not necessary to choose smooth round stones. The most uneven curved stones can work to your advantage. Lay them out, try them on next to each other and try to see the outlines of your future craft in this arrangement. Who knows what masterpiece your little “rock garden” will give birth to on a piece of paper.

You can also use shells as a natural material for crafts in the form of Santa Claus. It will turn out interesting and beautiful.

You can come up with your own New Year's pictures from magic pebbles. Do not forget to spray the craft with hairspray - this will make it brighter and will not stain your hands with gouache or smudge. You can also sculpt some details of such a panel craft from plasticine (it can also be coated with hairspray)... or sculpt it from papier mache ( paper napkin mixed with PVA glue, see point above in this article).

Craft Santa Claus
Made from plasticine.
From ordinary plasticine (or from polymer clay) you can do it too handsome Grandfather Frost. The main thing is to work slowly and remember to wash your hands when moving from one color of plasticine to another. There we will get pure colors of the parts and the whole craft will look neat.
After making the craft, you need to dry it in a cool place and spray it with hairspray. This is necessary so that it stops being sticky and does not collect room dust. You can cover the craft with acrylic matte varnish with a soft brush. Acrylic lacquer for crafts is sold at office supply or craft stores.

Such varnished, non-sticky plasticine figures are also good because they can be used inside small Snow capsules. Where the foam snowball will fall. You can make capsules for plasticine Santa Claus with your own hands - from transparent plastic bottles. Cutting off the top and bottom of them and joining them together. Sprinkle nail glitter, sequins or foam balls inside, or cut the fluff from pillows with scissors - the fluff will slowly settle, creating the illusion of snowfall.


Can be done flat crafts made from plasticine. Roll out colored plasticine with a rolling pin on the table. A wooden rolling pin is not suitable - it leaves rough marks on the plasticine. A round glass bottle or a can of any deodorant can be used as a smooth rolling pin.
Place a stencil image (details of Santa Claus, or his clothes) on the rolled out layer of plasticine. We trace with a sharp object. Remove the stencil and cut with scissors along the scratched lines. We get planar parts from which you can put together a plasticine graphic applique. Or make something like this to decorate the kitchen in New Year's style(as in the photo below).

You can get ideas for plasticine crafts in the form of Santa Claus from New Year's cakes decorated with mastic characters. Santa Claus is often sculpted from sweet confectionery mastic from different angles. Look through New Year's cakes on Google and you will find many ideas for plasticine New Year's heroes.

You can find even more New Year's plasticine ideas for children's crafts in the classroom and at home in a special article on our website
DIY Santa Claus
FROM CONES.
Pine and fir cones can also be painted with gouache (like the stones from the paragraph above). And when painted, the cone immediately becomes interesting basis for a New Year's craft in the form of Santa Claus. We insert beads and buttons, a fluffy dusting brush painted with white gouache becomes a fluffy beard. Cut out a hat from a piece of felt.

Also in the company of Santa Claus you can make a deer with your own hands (also from pine cones) (with antlers from fluffy wire), a snowman, a penguin in a felt scarf, and a green Christmas tree pine cone, decorated with beads and flowers cut from lace.

Other bright crafts and toys made from pine and fir cones collected in a large article with photographs
Volumetric Santa Claus
From modular origami.
If you know how to fold an Origami module. It doesn’t cost you anything to create such a pot-bellied Santa Claus. YouTube is full of videos that will teach you how to fold a triangular paper origami module in 2 minutes. For 2 pm make yourself a bunch of modules (the family will help), and on the third evening fold Santa Claus. Assembly takes place without glue. Each module fits into each other - like a groove into a groove.

Green Christmas tree also consists of modular origami. And you can make a snowman and a deer, if you think with your head...

DIY Santa Claus
FROM PAPER CONES.
We all know how to make paper cones - like bags for seeds. We need a semicircle - which we roll into a bag and glue the side seam of the bag with glue (or not with glue, but with a stapler).
Or you can provide paper latches on the bag - slits and ears that fit into each other. On the template below we see that on the left we have an incision (short dotted line), and on the right there is a protruding eye (along the edge of the hem of the fur coat). We cut out such a template (diagram below), paint it and connect it into a bag - inserting the eyelet into the cut (or you can simply fix everything with glue without any ears).

Santa Claus is easy and quick to make based on a regular cone. Below I give large circuits for large figures. Life size The diagram corresponds to A3 format - it’s like two landscape pages. You won't be able to print it on a printer - you need to go to the printing center. But the craft will be large and nice in size.

Here's another one large template for the paper Santa Claus craft - it is also in A3 format - print in the center of the printout.

But this template is smaller - if you want, you can also enlarge it to a large size. Each craft is beautiful - you must agree. You can just imagine how Grandfather Frost stands proudly on the windowsill and pleases the eye. Great craft - elegant and simple.

Children's craft Santa Claus
From toilet paper rolls.
Cardboard rolls are great for children's crafts. In the photo below we see how you can play up the image of Santa Claus based on this “toilet roll” form.

The elements can be made from paper, felt, cotton wool, formiam, fabric or knitted socks.

Santa Claus and dishes
(pots, cups, plates).
And in this section of the article I want to show you how to make it yourself original craft from non-standard material.
You can make Santa Claus from flower pots. We will make a beard for this grandfather from gypsum plaster. You can buy it at a hardware store gypsum plaster(it’s cheap in small packaging, you can buy half a kilo). We dilute the gypsum mixture with water to a thick porridge. And quickly, before it thickens and dries, we sculpt a beard for Santa Claus. Pots can also be coated with plaster porridge, in those places where we depict fluffy fur or snow. If sprinkled on top glitter(nail polish) it will turn out that snowy places sparkle in the sun.


Or here are New Year's crafts from disposable colored cups. Here the cups are placed in a circle on the floor (glue the round dance together using hot glue from a gun). Then on a round dance we make a second tier-floor, then a third - they themselves will be rounded into a spherical shape (because the cups at the bottom are narrower than at the edge). We make one ball for the belly and one ball for the head of Santa Claus. We make mittens, a belt, eyes, a mustache, and a hat from paper and fabric.

And we begin to make a green Christmas tree from cups according to the principle of a round dance. But we put a paper cone inside it. And we also attach the cups along the upper floors to the walls of this paper cone.
From the remaining red cups and toilet paper rolls you can make cute Frosties with a cotton wool beard.

And disposable flat plates can become a source of such children's crafts. Place beige paper on the bottom of the plate (this will be the background of the face). Without a beige or pink background (just on a pale plate) it will not be beautiful.

Craft Santa Claus
Made from felt and formiam.
Now a new ornamental material has appeared on sale - formiam. This is a baby modern technologies very suitable for making voluminous, plump crafts that are well attached to each other with hot glue. In the photo below you see a Santa Claus craft made from formim (a porous thick material).

But crafts made from felt will still be more durable. And warmer to the touch. More dear, closer.


You can make Santa Claus appliques from felt on a round piece of paper - you will get a toy pendant for the Christmas tree.
Please note how in the photo below the fastening of the applique parts is done - with sparse stitches, parts are tacked here and there (the beard and mustache are held on by 4-5 stitches).
If you make a HOOP from cardboard, wrap it in fabric and decorate the front with a figure of Santa Claus, then we will get a headdress for the New Year. It can be worn for children's holiday dinners, or worn directly over a hat on the street - delighting passers-by with its New Year's look.

In addition to hard felt, you can use SOFT FLEECE. This is the material from which sweatshirts and bikers are made. It is suitable for sewing soft toys in the form of Santa Claus or plump pillows (as in the photo below).

But Santa Claus, where FELT (wool for felting) is present, is in the left photo below. And also a figurine of Santa Claus made from a ball of red thread and a piece of white centipon and a felt cap. The face can be made from a tennis ball, tinted beige.

Knitted Santa Claus.
You can also knit a New Year's Santa Claus from threads with crochet or knitting needles. Below, for inspiration, I have posted several photo samples of such DIY crafts.
You can simply crochet a flat figure. Use it as an applique for a craft, or as a toy pendant for the Christmas tree.

You can make a beard from chopped bundles of thread (fluffy like a real one) or simply tie it with a wedge (like a knitting sprout).


And here is an example of Santa Claus knitted with his own hands. Choose your favorite knitting method and start making a real surprise for the whole family with your own hands. Such New Year's toy will accompany your holiday every year, like a tradition, like a family heirloom, made by your mother’s beloved hands.

Here are some ideas on the theme of Santa Claus with your own hands - from everything - from paper to knitting. Now you will definitely make yourself a magical Santa Claus who will fulfill your wishes this year. Because you deserve it. Because you are good.
Continuation of PAPER crafts in the form of Santa Claus - in our SECOND article
Olga Klishevskaya, especially for the site ""
If you like our site, you can support the enthusiasm of those who work for you.
Happy New Year to the author of this article, Olga Klishevskaya.
Each of us, looking at childhood photographs, can see almost such a person next to us, not to be confused with the plastic blocks that were later produced in great numbers at defense factories.
So, we need:
1. Cotton wool, you need one that dissolves well into layers. I used the company "BELLA"
2. Sculptural plasticine
3. Paste
4. Wire
5. Sintepon
6. Acrylic paints
7. Newspapers and toilet paper (single-ply)
So let's get started. First, we sculpt the face of DM from plasticine, on a blank of foil. Do not try to carefully sculpt fine details; the face should be textured; elements that are too thin will disappear under a layer of paper.

Well, approximately like that.
Cook the paste. To do this, boil 200 g of water in a saucepan. In another 200 g of cold water, dilute 2 tbsp. spoons of flour. To avoid lumps, filter through a sieve, and, stirring thoroughly, add this mixture to boiling water. Bring this mixture to a boil (actively stirring) and remove from heat. The paste is ready. From experience I understand that it doesn’t store well, so it’s easier to prepare a fresh portion right before work.
We wet the plasticine muzzle generously with water and apply (without glue) a layer toilet paper The smaller the pieces of paper, the more accurately the papier-mâché mask will replicate our plasticine cast. We again make the second layer on water, but from newsprint to prevent gaps.


We make the third and subsequent layers using paste. The number of layers should not exceed 8-9, this is quite enough for strength and preservation of facial features.
We dry it, a day near the battery lasted me. Take out the foil and plasticine. The mask is ready.

We fill the mask with padding polyester, forming the back of the head. And glue on several thin layers of cotton wool.


To make it convenient to work with cotton wool, I spread polyethylene on the table, put the required layer of cotton wool on it, and generously spread it with paste. We move this layer to the place we need. And also generously lubricate the dry side of the cotton wool with paste already at the site. I had a bowl of water and a towel at hand, because you can only work with the next piece of cotton wool with clean, dry hands
We make a drawing of our Grandfather based on the size of his head. My carcass height is 4.5 head heights. Based on this drawing, we make a wire frame, immediately giving the desired shape to the arms.


We wrap the carcass with padding polyester, giving it the required volume. We pass along the top with threads, securing the result.

We put the head in place and cover the torso with cotton wool. Work with cotton wool as with fabric, cut with scissors, cutting out the necessary elements.
That's all for today. Leave to dry. Each layer must dry thoroughly. Because the paste creates a film; if you don’t dry it completely, then Santa Claus will be eaten by voracious insects.
For a voluminous dress, you need to make a wire frame. In order for the cotton wool to fit well on it, the wire must be wrapped with threads. For this I use knitting threads, they are thick and fit well on the wire.

We glue the wire frame over it. And we put the hat on our head, since it has already dried.

We sculpt them as if we were working with plasticine. At the same time, we finish the hat by gluing the “fur” trim.

We dry this workpiece especially carefully, because... The volume of cotton wool is already quite large.
We paint the fur coat, for this we use ordinary acrylic paints.

When the paint dries, glue the “fur” onto the fur coat and collar.

We form a beard from several layers of cotton wool, picturesquely crumpling it with our hands to create the appearance of volume. In the same way we make the hair that is visible from under the hat and the mustache.

Before painting, the cotton wool must dry very well, because... acrylic will create a protective film and the internal drying process, if not stopped, will be significantly slowed down.
We draw the face, dye the hair and beard.

We decorate the fur coat. I took acrylic gold, applied it to a sponge, wiped the sponge on paper many times and, with an almost dry sponge, went over the entire fur coat. And I muted the red and got a festive sparkle. I made a pattern on the hem.
Guzalia Safargaleeva
Every year in our kindergarten there is creative competition New Year's crafts. This year the theme of the competition is "Granddaughter of Santa Claus." Parents with children and employees participate kindergarten. I take part in such competitions with pleasure. I like to invent and create something new and interesting.
To make your own Snow Maiden I used the papier-mâché technique.
Material used: cardboard egg cup, PVA glue, newspaper, tape, masking tape, wire, putty, acrylic paint, colors (blue, beige, red, black).
1. Soak a cardboard egg cup in hot water.

2. After the paper gets wet and can be easily split into fibers, squeeze it well and mix it with PVA glue. Mix until smooth.


3. Make a shape from newspapers and tape.

Cover the last layer with masking tape. This is necessary so that the mass sticks and holds better.

4. We make hands from wire.


We also cover it with masking tape.


I inserted store-bought eyes, made a braid out of thread, and tied it with a satin ribbon.
We insert both the eyes and the braid during the sculpting process until the mass dries.


6. After the work has dried well (drying takes about a day), puttying and painting begin. I wrapped the braid in cellophane so as not to stain it. After puttying, you need to sand it a little to remove unevenness. Of course, I didn’t get it perfectly smooth.
We make a beautiful Santa Claus from papier-mâché with our own hands. We can easily and absolutely free make crafts that are relevant in 2015 for New Year's holidayWe make a beautiful Santa Claus from papier-mâché with our own hands. We can easily and absolutely free make crafts that are relevant in 2015 for the New Year's holiday.
New Year is an unforgettable holiday. A wonderful fairy tale in the middle of a long and cold winter. And what is a real fairy tale without the main character? And what is the main person in each New Year's story? That's right, Santa Claus. Not a single New Year's holiday would be complete without this cheerful old man with his many jokes, funny and useful stories, and entertaining competitions. But most of all, children adore him, because it is he who brings them the desired gifts and pampers them with pleasant sweets. Therefore, it is very important that every child has a delightful Grandfather Frost under his Christmas tree. Such a wonderful craft will not only perfectly entertain and delight your child, but will also fit perfectly into the interior of the room, giving it a piece of real holiday fantasy. Today we will offer you to make Santa Claus from papier-mâché with your own hands. At first glance, it may seem that such a craft is too difficult to perform, but in fact, thanks to our simple instructions, enriched with a large number of photos, you can make it not only as simply as possible, but also completely free. So let's get down to creating such a wonderful product!
In order to make Santa Claus from cotton papier-mâché you will need:
 It will be easiest for you to work using PVA glue; you will not need to make it additionally. But you can also use any adhesive mass of your choice, for example paste. If you choose a paste, then first you will need to make it:
- The first option is flour paste. To make it, dilute two tablespoons of flour in a glass of water. Then stir thoroughly until there are no lumps left. Carefully pour the resulting mass into one liter of boiling water, while stirring the entire substance. Reduce the heat slightly and continue cooking for a few more minutes, remembering to constantly stir the liquid.
- The second option is starch paste. To make it, pour one glass of cold water into a saucepan and add a couple of tablespoons of starch. After this, mix everything thoroughly. The next step is to add a little boiling water. The result should be approximately one liter of liquid. Place the container on the fire and wait until all the liquid boils. At the same time, do not forget to stir.
Important to remember! If you want to work with paste, you will need to lay all layers evenly, otherwise undesirable results may appear in the form of yellow spots. True, this will be a problem only if the craft must have a white color; in all other options, this drawback will be perfectly hidden by ordinary paint.  Let's proceed directly to creating our Santa Claus. The first step is to make a frame from wire or any other material you choose. After that, we begin to wind white cotton wool onto the frame in even layers.
  When the figure you are making becomes strong and thick enough, reinforce the cotton wool with threads or tape. After this point, we move on to the main stage - gluing the cotton layers. To do this, first divide the cotton wool into thin layers, and then carefully apply it to the parts of the frame, thoroughly coated with paste or PVA glue. Do not skimp on the glue; the layers of cotton wool should be wet down to the base. Once the main outlines of the figure are completed, you can begin to create smaller details. To do this, you will need smaller pieces of cotton wool, previously soaked in paste.
  The most difficult part of the craft is the face. In order to get a smooth surface, you will need to make each layer evenly in thickness and make sure that no lumps appear. If you want your surface to be even more even, cover the workpiece with ordinary thin paper.
 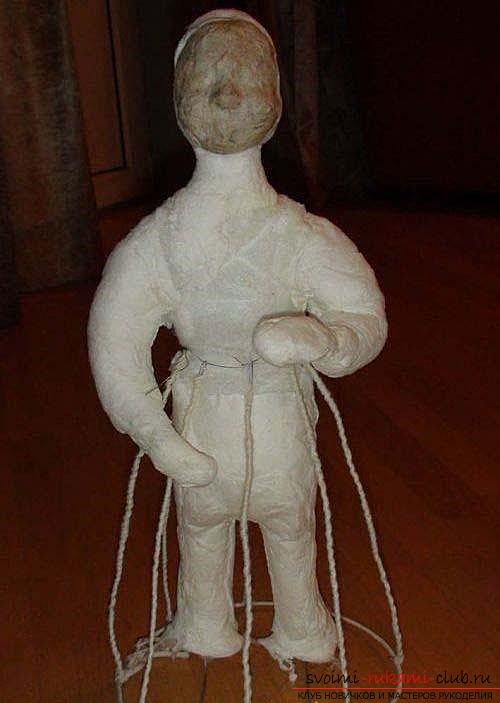 Next, use wire to make a frame for our Santa Claus’s dress. The resulting base will need to be tied with strong knitting threads. If you don’t have these, you can replace them with construction paper tape.
  The next step is to cover the frame of the dress with cotton wool and make a hat for your head. When finished, you will need to thoroughly dry our Santa Claus. On average, drying can take from two to four days, depending on the size of your craft. You can also use another method. Fix two or three layers of cotton wool and then dry and only then continue working further. This option will take much more of your precious time, but the craft will turn out neater. If you used as a basis plastic bottle or a foam plastic cone, the manufacturing process will be practically no different. The only point is that only hands will need to be made from wire.
 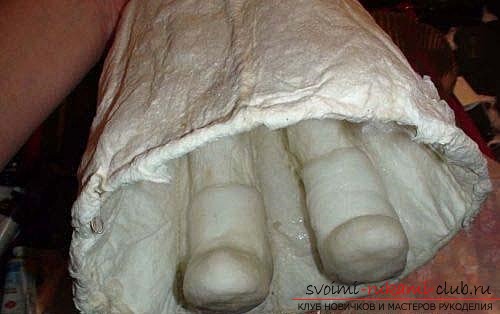 You can also make felt boots if you wish. They are molded from cotton wool in exactly the same way as from simple plasticine.
  Afterwards you will need to glue the border to the edges of the cap.
  When the craft is completely dry, you can start painting. Any paint you have at home is perfect for this.
  Once the paint has finished drying, glue beautiful white fur to the fur coat and Santa Claus hat.
  Next, make a beard out of cotton wool. In order for your Santa Claus's beard to be as full as possible, you need to thoroughly crumple the cotton wool. In the same way, make the hair that will peek out from under the cap and mustache. After this, wait until the craft is completely dry. It is strongly recommended not to try to speed up the drying process with a hair dryer. Using this method, you will cause the top edges to form a dense crust, and the bottom edges will not dry out enough.
  The last step is to draw Santa Claus's face and color his beard and hair. Acrylic gold is perfect for decorating a fur coat in an original way. Give Santa Claus a beautiful golden or white staff, place it in the place of your choice and the craft is ready. Thus, in just a few days, using simple and affordable materials, you made a wonderful Santa Claus from papier-mâché with your own hands completely free of charge. This craft will not only wonderfully decorate the interior and bring the spirit of the New Year holiday into the house, but will also serve you and your children as a wonderful decoration for many decades. Therefore, do not be lazy, start creating a magical Santa Claus from papier-mâché with your own hands now and let the coming 2015 be a truly wonderful and fabulous year for you and your family. Also, don’t forget to share your impressions and results of the work done in the comments with other users of the site.
Comments
Related posts:
New Year's craft: Santa Claus's boot for the 2015 Competition, DIY New Year's crafts DIY crafts: Santa Claus's tower for the 2015 Competition, interesting crafts for the new year with your own hands
It's easy to make a Santa Claus figurine with your own hands. The technique for making it is very simple - it is papier-mâché. You can determine the height of the figure yourself, as well as model the design itself. With careful work, the figurine may well become an original gift souvenir. We will show you several options for such figurines, which you can simply repeat based on the master classes, or improve them to your own taste.
Materials
To make a figurine of Santa Claus using papier-mâché technique, prepare everything you need:
- cardboard;
- PVA glue;
- newspapers;
- plastinil*;
- priming;
- acrylic paints;
- brushes;
- wire.
*Plastinyl is an adhesive mass used for sealing cracks in construction or as a basis for sculpting decorative elements. Sold in construction stores.
Step 1. First, you need to make a base for the figurine. It is most convenient to use cardboard as such. For the figures of Santa Claus in a fur coat, you will need to make a cone with a cardboard base. To give the workpiece the shape of shoulders, a rectangular base should be made from the same material. It needs to be installed on a cone.

Step 2. In order for the rough base to acquire relatively recognizable forms, it needs to be modified using the papier-mâché technique. For this purpose, a newspaper or plain paper tear into small pieces and, using glue and a brush, begin to paste over the cardboard blank. Smooth out sharp corners. In places where you need to glue more paper for volume, stick it in layers, allowing the previous layer to dry a little. After the blank with recognizable shapes has been molded, leave the figure alone until the paper is completely dry.


Step 3. Take platenile and use it to sculpt individual parts. In this case, this is the beard of Santa Claus, the main features of his face, mittens and the trim on his fur coat.

Step 4. After the plastinyl has completely dried, coat the figure with a primer.

Step 5. The final finishing of the figurine will be painting it with acrylic compounds. To be on the safe side, you can coat the finished Santa Claus with varnish.


Step 6. Santa Claus can also be made in the form of another figure reminiscent of Santa Claus. To do this, just do it with legs. In this case, the cardboard base will be two narrow cylinders. You will need to attach a cardboard body to them.

Having secured the wire in the shoulder area, bend it slightly, giving it the shape of bent arms. Insert a wooden stick into your hand, which will play the role of a staff.


